About USB 3.0

https://storagesolutionsurabaya.files.wordpress.com/2013/05/dual-bus-usb3-cables.jpg

Sudah bertahun-tahun lamanya konektor USB menjadi interfaces standar untuk perangkat-perangkat ke komputer. Mulai dari hardisk, DVD, printer, mouse, keyboard, dan beberapa perangkat lainnya yang support USB.

Bicara mengenai USB, teknologi ini sudah mulai dikembangkan sejak tahun 1993. Dengan model pertamanya yaitu, USB 1.0 yang mulai diperkenalkan pada tahun 1996. Pada versi ini kecepatan transfer masih sangat rendah untuk ukuran jaman sekarang, yaitu 1,5 Mbits/s – 12 Mbits/s. Beberapa tahun setelah itu, dikembangkan lagi dan hadirlah USB 2.0 pada tahun 2001. Perkembanganny terbilang sangat pesat, karena data-rate bisa mencapai 480 Mbits/s. Baru pada tahun 2010 silam, USB 3 diluncurkan.

Memag USB 3.0 ini bukanlah hal baru lagi, karena sudah hadir sejak tahun 2010. Namun pada artikel ini, saya sengaja mengangkat kembali beberapa hal mengenai USB 3.0 untuk menambah wawasan kita. Lalu apa saja yang perlu kamu ketahui mengenai USB 3.0 ini? Yuk, simak ulasan lengkapnya berikut ini.

Spesifikasi USB 3.0

Untuk memenuhi tuntutan dan dukungan terhadap perangkat eksternal, USB 3.0 ini hadir dengan sejumlah ketangguhan yang terbilang cukup bagus untuk saat ini. Berikut adalah spesifikasi yang dimiliki oleh USB 3.0:

Transfer Rate
Secara teoristis, kecepatan transfer yang dimiliki oleh USB 3.0 ini sangat terlampau jauh dari versi sebelumnya, yaitu berkisar antara 3,2 Gbits/s hingga 4,8 Gbits/s.

Transfer Data Dua Arah (Full Duplex)
USB 3.0 didukung oleh metode transfer full duplex. Dimana dua dari lima jalur yang ada disediakan untuk transmisi data, sementara yang lainnya digunakan untuk menerima data. Dengan demikian, USB 3.0 sudah memiliki jalur yang terpisah untuk penerimaan dan pengiriman data. Atau dengan kata lain USB 3.0 ini mampu membaca dan menulis secara bersamaan dan tentunya dengan kecepatan penuh.

Power
Penggunaan power pun lebih effisien, dari yang semula 4,4 V menjadi 4 V saja. Selain itu, arus juga sangat ringan yaitu 150mA. Oleh karenanya USB 3.0 ini sangat hemat energi dan mampu menjalankan kisaran 4-6 unit.

Power Management
USB 3.0 sudah didukung oleh power management yang bagus bila dibandingkan dengan USB 1.0 dan 2.0 . Karena power management pada USB 3.0 ini sudah mendukung sistem iddle, sleep, dan suspend.
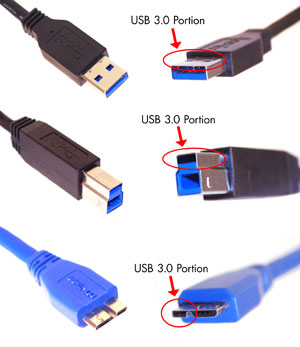
Bentuk Fisik
Pada dasarnya sama saja dengan USB 2.0, hanya saja pada USB 3.0 ini dimensi kabel sedikit lebih tebal karena terdapat lebih banyak kabel di dalamnya. Didalamnya terdapat 4 kabel dari USB 2.0, sehingga total ada 9 kabel. Oleh karena inilah USB2.0 masih bisa digunakan pada port USB 3.0, tapi sebaliknya USB 3.0 tidak bisa digunakan pada port USB 2.0.

Kelebihan USB 3.0

Bila dibandingkan dengan versi USB sebelumnya, USB 3.0 ini memliki banyak keunggulan, sperti berikut ini:

Kompatibel
USB 3.0 kompatibel dengan USB 2.0. Jadi, kamu masih bisa menggunakan USB 3.0 pada komputer lama yang memang masih menggunakan USB 2.0. Untuk performa akan mengikuti speesifikasi USB 2.0. Tapi sebaliknya kamu tidak bisa menggunakan USB 2.0 pada port USB 3.0.

Transfer Rate
Seperti yang sudah dikatakan sebelumnya, USB 3.0 memiliki kecepatan transfer yang sangat baik. Jadi, kamu bisa memindahkan file berukuran besar dalam waktu yang relatif sebentar.

Manfaat
USB 3.0 ini akan sangat bermanfaat untuk perangkat-perangkat seperti DVD eksternal, hardisk eksternal. Dan perangkat usb sejenisnya.

Dukungan Berbagai OS
Semua OS sudah dapat mendukung teknologi ini, mulai dari windows, linux, dan mac.

USB 3.0, Inilah Semua Hal yang Mesti Kamu Ketahui

Kekurangan USB 3.0

Meski didukung dengan banyaknya pengembangan dari versi sebelumnya, tetapi USB 3.0 ini ternyata masih memiliki kekurangan sebagai berikut:

Maksimum Kabel
Bila dibandingkan dengan USB 2.0 yang support sampai 5 meter panjang kabelnya, USB 3.0 masih kalah karena hanya support hingga 3 meter saja. Tetapi kamu masih bisa memperpanjangnya dengan dukungan USB hub.

Source : Pintarkompiter.com

How to Image Tag

Via Line25.com

Including Images in your Markup:

Well now that I have some content on my page, I want to include some images. Working with images is fairly straight-forward. In order for an image to appear on your web page, it has to be available online. This means that you should create a directory in your webspace called ‘images’ and you should upload all of your images there, then you can access them freely using HTML (see our tutorial on using FTP). The two favored formats for an online image is either .gif or .jpg (also called JPEG), but lately .png has also become somewhat standard.

Note: the ideal format for an image depends on how it was made. If you have an image that was made using a vector drawing program or has large blocks of continuous color, the best fit would be a .gif. If you are saving a photograph, your best fit would be a .jpg.

IMG Tag:

For a straight and simple insertion of an image into your code, use the following tag syntax:

<img src=https://www.yourDomainName.com/images/imageName.gif" alt="My website image" border="0">

The alt attribute is very important and should not be forgotten. It can be replaced with the title attribute and both give a description of your image in case it does not load for some reason. Both will also cause a ‘tool-tip’ or small text box to appear when a user’s mouse hovers over your image, so you can add more descriptive information if you wish.

I have put the border attribute within the image tag because when an image is included in a link (which we will be covering a bit later on) it places a default border on the image. It is a good habit to code a border of 0.

We looked at padding, margins, and floats in the last tutorial. We can also use these style declarations on an image.

Let’s look at our two column layout from the last tutorial and add some images using the <img> tag.

Here is the HTML:

<div id="wrapper">
<div style=”width: 768px; background-color: #b6c39a; border: 1px solid #000000; border-bottom-width: 0px; text-align: center “><img src=”https://photos.bravenet.com/166/366/683/3/4B3DA81507.gif” border=”0″></div>
      <!--this is the section on how I found billie -->
      <div class="column">
         <h1>How it Started</h1>
         <img src="https://photos.bravenet.com/166/366/683/3/F88EB5A65E.gif" border="0" style="float: right; margin-left: 5px;">
         <p>It was a warm sunny spring day in Pedro Ohio when a colleague and I went to a local farm to ask if we could do some surveys on the <em>'crick'</em> that ran through the back of their property. </p>
         <p>The farmer who owned the land approached us with a jocular, gap-toothed smile and asked us "do y'all like puppies?". I responded with a tentative "yyeeesss -why?" "Well..." he said, "my girlfriend found this puppy out in the back forty, and I'm a gonna have-ti shoot it... that is... unless you want it." I responded immediately with "don't shoot the little puppy, I will come back for it at the end of the day."</p>
         <p>This is the story of how I found Billie-Mae. When I went back to pick her up she was a tiny five week old puppy, bloated with worms, covered in lice, ticks and fleas, starving, with a puncture hole through one eyeball.</p>
      </div>
      <! - this is the section on how she turned out -->
      <div class="column" style="margin-left: 16px;">
         <h1>How it Turned Out</h1>
          <img src="https://photos.bravenet.com/166/366/683/3/AF337E590C.gif" border="0" style="float: right; margin-left: 5px;">
         <p>With time and care and a lot of flea baths, Billie's hair grew back in the soft velour of most puppies. The local vet told me that she was a very special dog because of her genetic history. The story in that area is one of dog over-population due to a general lack of spaying and neutering. </p>
         <p>Dogs run wild <em>-literally</em>. According to the vet, Billie-Mae is about a sixth generation wild dog. After this period of interbreeding and feral living she has become just like many other dogs in the world who are feral. They develop common characteristics such as medium height, stocky chest, pointy ears and curly tail. I like to call her my "Yankee Dingo".</p>
         <p>Apart from a few allergies she has turned out to be quite healthy and vivacious despite her rough start.</p>
      </div>
</div>

Since we have an embedded style sheet, I’m going to give those images a class name and take the inline style out.

<img class="billieImage" src="https://photos.bravenet.com/166/366/683/3/AF337E590C.gif" border="0">

I’ll do the same for my div tag containing the header image:

<div id="header"><img src="https://photos.bravenet.com/166/366/683/3/4B3DA81507.gif" border="0"></div>

So my style rule for class name billieImage will be:

.billieImage { float: right; margin-left: 5px;}

But we learned a quicker way when we were dealing with Divisions and Paragraphs so let’s use the same method for the ‘.billieImage’ elements. I remove the class and style attributes from the IMG tag and use the class from the division named ‘column’. My style declaration will look like the one for my paragraph.

.column img { float: right; margin-left: 5px;} - Much quicker and cleaner.

The rule for id header will be:

#header {width: 768px; background-color: #b6c39a; border: 1px solid #000000; border-bottom-width: 0px; text-align: center;}

I will leave the header id alone as it defines only one instance and can’t be grouped with the others.

Note: Why did I wrap my header image in a div? Well the width of my website is 770px, but my image was only 760px, so I added a div with the same background color and centered it. Just a little trick. I removed the bottom-border because there was already a top border on my navigation.


Source : https://resources.bravenet.com