Tag Archives: ubuntu

[Ubuntu] Disable lock-screen di Ubuntu Mate 16.04 LTS

Kronologi

Beberapa hari ini, saya mengalami masalah kecil pada Ubuntu mate 16.04 yang saya gunakan. Ketika saya melakukan suspend kemudian menutup lid laptop kemudian membuka lid laptop, kursor saya tiba-tiba hilang. Bahkan saya tidak dapat mengetik password pada lock-screen yang muncul.

Solusi

Untuk mengatasi masalah ini, salah saeorang teman, sesama pengguna GNU/Linux menyarankan saya untuk menonaktifkan lock-screen, karena mungkin letak masalah ada disitu.

Saya melakukan saran tersebut dan setelah saya coba masalah saya SOLVED. Terima kasih untuk teman-teman sesama pengguna GNU/Linux.

Langkah-langkah

Berikut ini cara disable lock-screen pada ubuntu mate:

  1. Buka dconf editor
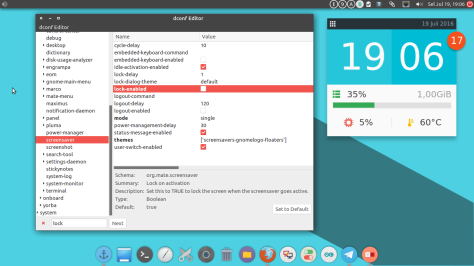
  2. Masuk ke org > mate > screensaver
  3. Cari lock-enabled dan buang ceklist
  4. Logout, dan login lagi

Skrinsut:

disable lock-screen ubuntu mate

Semoga bermanfaat.
Terima kasih

Sumber

How To Use MATE File Manager (Caja)

After PCManFM, we introduce here basic Caja File Manager usage. Caja is a descendant from the old Nautilus from GNOME 2.x era. You will find Caja File Manager in Ubuntu MATE, Linux Mint MATE, or any other distribution using MATE as its desktop environment.  It keeps many features from the past, such as emblems and split views. We use Caja 1.8.2 from Ubuntu MATE 14.04 here. We hope this will help new users. Enjoy.

Overview

  1. Menu bar.
  2. Tool bar (navigation, refresh, zoom, mode).
  3. Address bar.
  4. Left Panel (sidebar, view changer).
  5. Status bar.
  6. Main area.

Continue reading How To Use MATE File Manager (Caja)

Deploy Outbound NAT Gateway on Ubuntu

Introduction

A common network infrastructure may consist of an private network on an isolated subnet. While there may be no need for incoming connections to access the private network from the outside, there are occasions when you may need servers within the private subnet to make connections to services outside of the subnet or to the public Internet. An example may include downloading a software package, sending backup data to an external location, or applying system updates to servers on the private subnet.

A Linux gateway server with two network interfaces, or NICs, can be used to bridge two networks together. One NIC will connect to an external, or public, network while the other NIC will connect to the private subnet. IP forwarding and a NAT rule are then used to route traffic from the private subnet out to the external network.

The traffic from the internal servers will appear to be originating from the gateway IP address. Externally generated traffic will reach the gateway and have no visibility of the private subnet.

While beyond the scope of this tutorial, the gateway server firewall can be modified to restrict outbound traffic from the subnet. Continue reading Deploy Outbound NAT Gateway on Ubuntu

Set Custom Keyboard Shortcut Key in Ubuntu

Ubuntu gives us easy way to bind a shortcut key with any program. Suppose you want to open Firefox when Win+G are pressed. Or press Win+H to open text editor. This can be achieved by using internal Ubuntu System Settings. You don’t need to install any external program.

Normal Applications

Open System Settings (gear logo) > Keyboard > Shortcuts > press Custom Shortcuts > press plus (+) button. Here, name your shortcut i.e. Mozilla Firefox and type the command. You must know the command exactly, e.g firefox is command for Mozilla Firefox. Another command examples such as brasero for Brasero, thunderbird for Mozilla Thunderbird, evince for Evince, and so on. Remember that they are case sensitive. Now, click the line you’ve created and press the keys i.e. Win+H.

Commands

Suppose you want to execute a command line from keyboard shortcut. For example, turning the brightness down/up. Of course, there are thousands and more possible commands to bind with shortcut key. Imagine you can pipe or redirect somethings by just pressing shortcut key. To do it, do the same like normal applications and type the command line i.e. xrandr –output LVDS1 –brightness 0.5 to turn brightness down and xrandr –output LVDS1 –brightness 1 to turn it up. Again, after typing a command, click the line you’ve created (see right panel) and bind the keys i.e. Win+J.

Sumber: https://www.ubuntubuzz.com/2015/10/custom-keyboard-shortcut-key-ubuntu.html#more

How To Deploy Kohana PHP Applications on a Debian 7 / Ubuntu 13 VPS with Nginx and PHP-FPM

Introduction

Kohana comes as a self-contained package, with each copy forming a new base for a new web application, making things quite easy for deployment.

In this DigitalOcean article, following our previous ones on installing and getting started with Kohana, we’ll see how to prepare a VPS to deploy a Kohana based PHP web application – using Debian 7 / Ubuntu 13 as our host operating system.

Note: This is the third article in our Kohana series, focused on deploying applications built using the framework. To see the first part and learn about installing it, check out Getting Started with Kohana. To see about understanding the framework’s modules to build a web application, check out Building Web Applications with HMVC PHP5 Framework Kohana.

Glossary

1. PHP Based Web-Application Deployment

Continue reading How To Deploy Kohana PHP Applications on a Debian 7 / Ubuntu 13 VPS with Nginx and PHP-FPM

Steam Controllers Don’t Work in Ubuntu, Here’s What You Need to Do

It’s not a difficult fix, but it should work by default

The Steam Controllers have started to ship to gamers across the world, and some people are already using them to play games. Unfortunately, the Steam Controllers don’t work by default with Ubuntu, but there is a workaround in place.

The fact that Steam Controllers don’t work in Ubuntu is not new information. In fact, a couple of bugs on Launchpad were opened a while back, and it looks like the Ubuntu devs didn’t take care of them. It’s not clear why they didn’t fix the issue, but the fact of the matter is that they don’t work with Ubuntu OSes. A workaround is available; it’s not ideal, but it should only be a temporary solution.

A question and an answer were posted on askubuntu.com to prevent the eventual problems that the community would encounter. As I said before, it’s not the easiest or most elegant solution, but at least it’s possible, and it won’t create too many issues, with the exception of the fact that you might need to download a lot more packages than you would want.

Continue reading Steam Controllers Don’t Work in Ubuntu, Here’s What You Need to Do

Configure BIND as a Private Network DNS Server on Ubuntu 14.04

Introduction

An important part of managing server configuration and infrastructure includes maintaining an easy way to look up network interfaces and IP addresses by name, by setting up a proper Domain Name System (DNS). Using fully qualified domain names (FQDNs), instead of IP addresses, to specify network addresses eases the configuration of services and applications, and increases the maintainability of configuration files. Setting up your own DNS for your private network is a great way to improve the management of your servers.

In this tutorial, we will go over how to set up an internal DNS server, using the BIND name server software (BIND9) on Ubuntu 14.04, that can be used by your Virtual Private Servers (VPS) to resolve private host names and private IP addresses. This provides a central way to manage your internal hostnames and private IP addresses, which is indispensable when your environment expands to more than a few hosts.

The CentOS version of this tutorial can be found here.

Prerequisites

To complete this tutorial, you will need the following:

  • Some servers that are running in the same datacenter and have private networking enabled
  • A new VPS to serve as the Primary DNS server, ns1
  • Optional: A new VPS to serve as a Secondary DNS server, ns2
  • Root access to all of the above (steps 1-4 here)

If you are unfamiliar with DNS concepts, it is recommended that you read at least the first three parts of our Introduction to Managing DNS.

Example Hosts

For example purposes, we will assume the following:

  • We have two existing VPS called “host1” and “host2”
  • Both VPS exist in the nyc3 datacenter
  • Both VPS have private networking enabled (and are on the 10.128.0.0/16 subnet)
  • Both VPS are somehow related to our web application that runs on “example.com”

With these assumptions, we decide that it makes sense to use a naming scheme that uses “nyc3.example.com” to refer to our private subnet or zone. Therefore, host1‘s private Fully-Qualified Domain Name (FQDN) will be “host1.nyc3.example.com”. Refer to the following table the relevant details:

Host Role Private FQDN Private IP Address
host1 Generic Host 1 host1.nyc3.example.com 10.128.100.101
host2 Generic Host 2 host2.nyc3.example.com 10.128.200.102

Note: Your existing setup will be different, but the example names and IP addresses will be used to demonstrate how to configure a DNS server to provide a functioning internal DNS. You should be able to easily adapt this setup to your own environment by replacing the host names and private IP addresses with your own. It is not necessary to use the region name of the datacenter in your naming scheme, but we use it here to denote that these hosts belong to a particular datacenter’s private network. If you utilize multiple datacenters, you can set up an internal DNS within each respective datacenter.

Our Goal

Continue reading Configure BIND as a Private Network DNS Server on Ubuntu 14.04